Brand Caption Kit: 5 Ultimate Steps for Multi-Clients
Building a Custom Brand Caption Kit for Multiple Client Accounts (2026) If you edit short-form clips for three different clients inside the same Adobe Premiere Pro timeline, you will eventually put Cl
If you edit short-form clips for three different clients inside the same Adobe Premiere Pro timeline, you will eventually put Client A's neon pink captions on Client B's finance podcast. I used to burn 4 hours every single week manually adjusting font weights, fixing hex codes, and reapplying text styles across client tracks. It was exhausting, repetitive, and completely unnecessary.
When you manage content for multiple client brands, relying on memory to match fonts and safe zones always breaks down under deadline pressure. Visual crossover looks sloppy, ruins client trust, and damages your reputation as a professional editor. Building a standardized brand caption kit directly inside Adobe Premiere Pro solves this workflow problem once and for all.
Key Takeaways
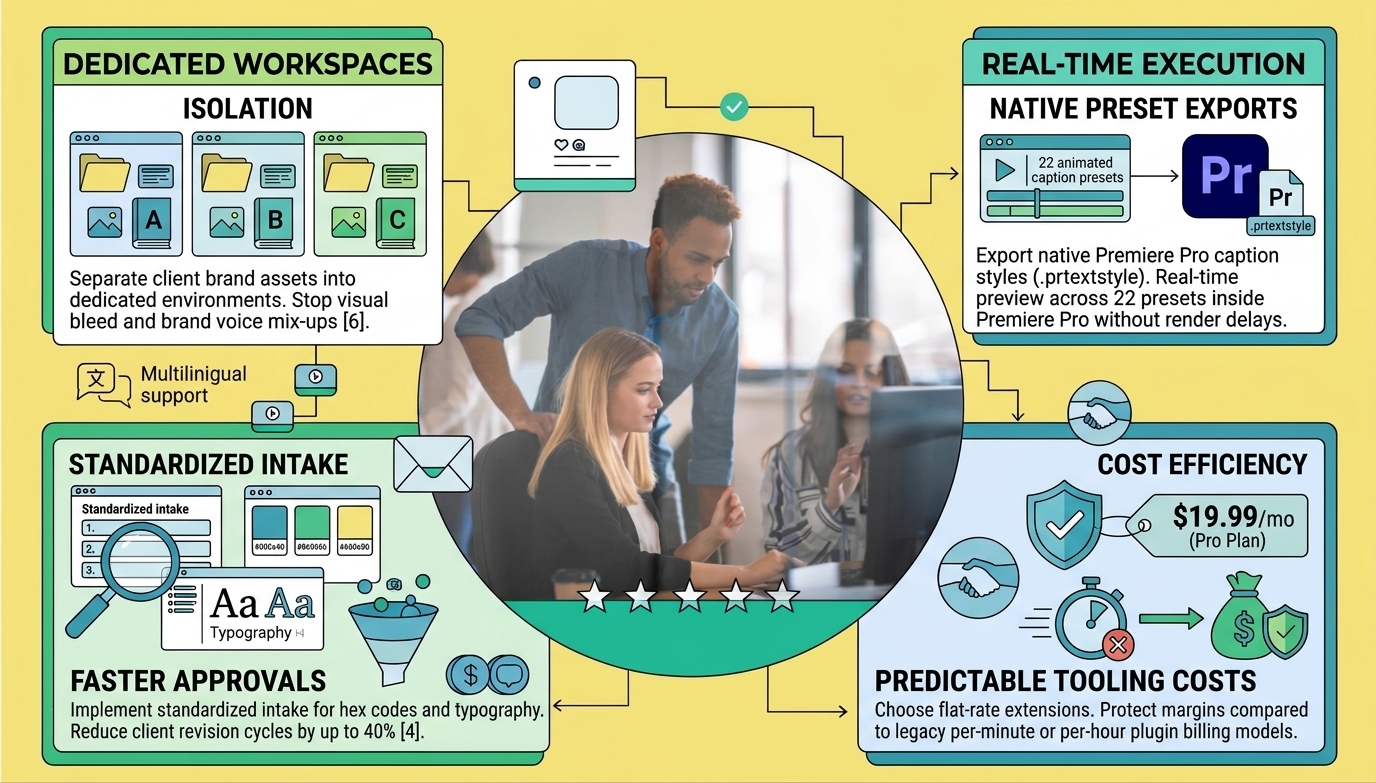
- Workspace Isolation: Separating client brand assets into dedicated project environments stops visual bleed and brand voice mix-ups [6].
- Native Preset Exports: Exporting native Premiere Pro caption track styles (
.prtextstyle) cuts formatting rework down from hours to seconds [3].- Faster Approvals: Implementing a standardized intake process for hex codes and typography reduces client revision cycles by up to 40% [4].
- Safe Zone Testing: Testing text placement against Instagram Reels and TikTok UI overlays prevents costly re-exports [9].
- Real-Time Execution: Tools like KreateFlo's CaptionFlow use WebAssembly (WASM) to offer real-time previewing across 22 animated caption presets inside Premiere Pro without background render delays.
- Predictable Tooling Costs: Choosing flat-rate extensions at $19.99/mo for Pro plan access protects margins compared to legacy per-minute or per-hour plugin billing models.
Why Building a Custom Brand Caption Kit for Multiple Client Accounts Is Essential
Managing multiple client brands without a standardized asset pipeline leads straight to timeline chaos. Industry research from the Grand View Research market report shows the social media management sector hitting $36.4 billion in 2026 [7]. Client content volume is exploding. So when you scale up your editing output, manual formatting tweaks quickly turn into massive production bottlenecks.
The Hidden Cost of Manual Caption Formatting
Formatting captions by hand for every clip drains your daily edit time. Opening the Essential Graphics panel in Premiere Pro to pick fonts, adjust tracking, set stroke width, and position baseline coordinates takes about three to five minutes per video. Multiply that across 30 short clips a week for four clients. You are wasting 4 hours every week on basic button clicking.
Data published in the BlazeHive marketing report highlights that 94% of social media marketers use AI in workflows [8], while 49% rate video as their single most important content format [8]. If your process relies on manual re-formatting, you fall behind editors who automate the repetitive work.
"Formatting text manually for every single sequence isn't 'custom craft'—it's wasted overhead that caps your monthly client capacity."
Avoiding Visual Bleed Across Client Timelines
Visual bleed happens when a clip ships with the wrong font, accent color, or animation style. OutlierKit documented a case study on structural client workspace isolation where a social agency accidentally posted an off-brand message for Chrysler, costing them the contract [6].
When your team juggles multiple client sequences in one project file, wrong asset drop-ins happen fast. SocialCTL's identity framework emphasizes using 59 brand identity fields across dedicated project workspaces to isolate client assets completely [5].
Cutting Client Review Cycles by Up to 40 Percent
Clients notice minor visual errors instantly. If a corporate law client receives clips styled in a playful script font, they send them straight back.
DesignLumo's agency workflow research proves that standardized brand kit setup guides cut client review and approval times by up to 40% [4]. When visual rules are baked into reusable caption kits upfront, approvals go through without friction.
[[STAT:40%:Reduction in client approval cycles]]
Actionable Takeaway: Stop adjusting caption settings manually for individual clips; create a dedicated brand kit folder for each client account before starting edits.
The Client Intake Process: Gathering Hex Codes and Branding Assets
A solid brand caption kit starts before you touch the timeline. You need precise asset parameters from the client upfront. Never accept vague intake emails like "use a bold font with light blue text."
Client Intake Checklist:
- Primary Brand Color (HEX)
- Secondary Accent Color (HEX)
- Background Pill Box Color & Opacity
- Approved Font Files (.otf / .ttf)
- Vertical Safe Zone Offset (Pixels)
- Preferred Animation Style
The One-Page Client Visual Reference Sheet
Build a standardized intake sheet to capture core visual elements for every client. Keep this information on a single sheet per account.
Include primary hex codes, secondary accent colors, background pillbox opacities, and approved font weights. Keeping a single reference file stops your team from digging through messy Google Drive folders while cutting sequences.
Standardizing Font Files and Palette Hex Codes
Before creating text templates, grab the exact open-type (.otf) or true-type (.ttf) font files from your client. Adobe Premiere Pro requires these installed locally on every machine in your editing bay.
Do not guess font weight matches. If a client uses Montserrat Bold with a specific dark blue (#0033FF), substituting Arial Bold with standard cyan destroys their visual identity. Set up Adobe Creative Cloud Libraries or local project folders so every editor accesses identical font files and color swatches.
Defining Platform-Specific Safe Margins Upfront
Short-form platforms treat vertical screen real estate differently. TikTok stacks username overlays, captions, and sound titles over the lower third. Instagram Reels places action buttons along the right edge and keeps a clear top margin.
+-----------------------------------+
|          [TOP SAFE ZONE]          |
|    Keep header text below here    |
+-----------------------------------+
|                                   |
|        OPTIMAL CAPTION ZONE       |
|      Center 1-3 lines max        |
|                                   |
+-----------------------------------+
|       [BOTTOM SAFE ZONE]          |
|  Avoid TikTok / Reels UI Overlays |
+-----------------------------------+
Confirm primary distribution channels during intake. That way, you can set vertical anchor points that keep text clear of mobile app controls.
Pro Tip: Always build your caption templates at 1080x1920 vertical resolution. Set the vertical baseline position between 1350px and 1450px from the top to stay clear of app overlays on TikTok and Instagram Reels.
Actionable Takeaway: Send a structured intake form to new clients to collect exact hex codes, custom font files, and target platforms before editing the first project sequence.
Step-by-Step: Building a Custom Brand Caption Kit for Multiple Client Accounts in Premiere Pro
Once you have client brand assets in hand, build native caption presets directly inside Adobe Premiere Pro. Native track styles render fast, stay fully editable, and share easily across team members.
Creating Isolated Project Workspaces for Each Client
Do not edit five different clients inside a single project file. Build a structured folder system on your storage drive for every account:
/Client_Name_Workspace
    /Brand_Assets
        /Fonts
        /Logos
        /Palettes
    /Premiere_Projects
    /Exported_Presets
        Client_Platform_v1.prtextstyle
Keeping accounts separate prevents editors from dragging assets into the wrong project sequence [6].
Exporting Reusable .prtextstyle Track Styles
Adobe Premiere Pro allows you to save text formatting as reusable style files. Here is the exact process:
- Create a native caption track or Essential Graphics text layer on your timeline.
- Open the Essential Graphics panel and configure font family, font size, tracking, alignment, fill color, and stroke settings.
- Select the formatted text block, go to the Text Style drop-down menu in Essential Graphics, and select Create Style. Name it clearly using your client naming structure (for example,
CLIENTA_IG_Reels_Primary). - Locate the style asset in your Project Panel, right-click it, and select Export Text Styles.
- Save the file with its native
.prtextstyleextension directly into your client's designated preset folder.
To apply this style in a new sequence, import the .prtextstyle file into your Project Panel and drag it onto your caption track. Premiere Pro automatically updates every subtitle block on that track to match the client's visual identity.
"A native
.prtextstylefile transforms a 20-minute formatting task into a 2-second drag-and-drop step across an entire sequence."
Establishing Standardized Asset Naming Conventions
Strict file naming prevents workflow confusion. Use a clear structure for all graphic presets: CLIENTNAME_PLATFORM_STYLE_VERSION.
For example, FINANCEPOD_REELS_YELLOWHIGHLIGHT_V1.prtextstyle leaves zero doubt about where the asset belongs. Clear names help assistant editors select correct presets instantly during tight production sprints.
Actionable Takeaway: Export approved text styles as .prtextstyle files from the Premiere Pro Essential Graphics panel and store them in dedicated client workspace folders.
Safe Zones, Accessibility, and Mobile UI Overlays
A caption kit must remain readable on mobile screens. If viewers struggle to read text over bright backgrounds or behind platform icons, watch time drops fast.
+-------------------------------------------------+
| Safe Zone Checklist:                            |
| [ ] High text-to-background contrast ratio       |
| [ ] Text positioned above 250px bottom margin   |
| [ ] Word wrap checked on small mobile viewports |
| [ ] Stroke or drop shadow enabled for contrast  |
+-------------------------------------------------+
Checking Text-to-Background Color Contrast
Always verify color contrast ratios between text fills, background pills, and underlying video footage. Plain white text without a background box or dark stroke disappears against light clothing or bright scenes.
Use dark strokes (3 to 6 pixels) or solid background box fills to keep text legible across changing footage backgrounds.
Mapping Captions Around TikTok and Instagram Reels UI Buttons
Platform user interfaces cover significant screen real estate. Data compiled by Sprout Social research shows that over 60% of product discovery happens on visual social platforms [9].
| 79.5%|Facebook | NaN |
|---|
Placing text too low covers it with account handles, sound titles, or engagement icons.
UI Overlay Heights across Short-Form Platforms:
- TikTok Bottom Overlay: ~280px to 340px
- Instagram Reels Bottom Overlay: ~220px to 260px
- YouTube Shorts Bottom Overlay: ~200px to 240px
Keep key caption blocks centered vertically within safe zones so critical phrases remain visible across all mobile feeds.
Testing Readability Across Mobile Screen Sizes
Editing on a 32-inch 4K monitor makes small text look easy to read. But most viewers watch short-form clips on small phone displays.
Downscale your program monitor preview to 25% size inside Premiere Pro. If captions feel hard to read at that preview scale, bump up font size or drop words per line before rendering final clips.
Actionable Takeaway: Toggle vertical safe-zone guides in Premiere Pro to verify text sits at least 250 pixels above the bottom edge before rendering.
Accelerating Multi-Client Captioning with KreateFlo CaptionFlow
Exporting native .prtextstyle files covers basic styling, but client projects often require word-by-word highlights and modern animations. Manual keyframing for animated captions across dozens of client clips drains hours.
That is why we built CaptionFlow, an AI tool embedded directly inside the KreateFlo extension for Adobe Premiere Pro (v1.0.3).

Instant Styling with 22 Animated Caption Presets
KreateFlo operates directly inside Premiere Pro as a native CEP extension. It is not an external web application or standalone browser tool that forces you to export XML files back and forth.
Inside the panel, CaptionFlow offers 22 animated caption presets. You can pick word-by-word pop animations, karaoke highlights, neon glows, or clean corporate reveals.
Instead of building complex text animations in After Effects, select your sequence segment, pick a preset, and apply customized client hex colors with a single click.
Tools like AutoCut provide 90+ fully editable presets for DaVinci Resolve and Premiere [3]. CaptionFlow focuses on a curated library of 22 optimized animations designed specifically for rapid short-form editing inside Premiere Pro.
Zero-Render Real-Time Preview via WASM Technology
Traditional graphics extensions slow down your timeline because they force background rendering whenever you adjust text parameters. CaptionFlow runs on a custom WebAssembly (WASM) rendering engine inside the Premiere panel.
You can tweak font sizes, update color codes, and swap animation styles while seeing changes instantly in real-time. No render delays, no frozen UI windows.
Flat-Rate Pricing vs Per-Hour Plugin Costs
Subscription models affect agency margins fast. Competitors like FireCut rely on usage-based per-hour or per-minute billing tiers that get expensive as client workload grows.
| Before | $19.99/mo Flat Rate |
|---|---|
| After | Per-Hour Usage Billing |
KreateFlo keeps pricing flat and predictable:
- Free Tier: 3 tools free forever (Silence Remover, Transition Assistant, Copy & Paste).
- Pro Plan: $19.99/month for 20 AI transcription hours and access to all 33+ tools.
- Studio Plan: $44.99/month for 50 AI transcription hours.
If you process 40 podcast clips a month, flat-rate pricing saves hundreds compared to per-hour billing systems.
Plugin Cost Comparison (40 Short Clips / Month):
+--------------------+---------------------+--------------------+
| Feature / Tool     | KreateFlo Pro       | Competitors        |
+--------------------+---------------------+--------------------+
| Billing Model      | Flat $19.99 / mo    | Per-hour / per-min |
| Included AI Hours  | 20 Hours            | Metered pay-as-go  |
| Preview Engine     | Real-time WASM      | Background render  |
| Ecosystem          | 33+ integrated tools| Single-purpose app |
+--------------------+---------------------+--------------------+
Honest Caveats: When KreateFlo Is NOT the Right Pick
Let's be transparent about where our software fits. KreateFlo is built strictly as a CEP extension for Adobe Premiere Pro.
If you edit exclusively in DaVinci Resolve or Final Cut Pro, KreateFlo will not work for your setup. And if you prefer a browser-based web editor like Descript or Opus Clip that runs outside traditional NLE software, KreateFlo is not the right fit. Our toolset is built for editors who work natively inside Premiere Pro every single day.
Pro Tip: Use KreateFlo's automatic voice transcription, which supports 40+ languages (including Bangla and Hindi), to generate initial subtitle tracks. Then apply your CaptionFlow animated presets over the generated text in seconds.
Actionable Takeaway: Install KreateFlo v1.0.3 to style client captions instantly using 22 animated presets with real-time WASM previewing inside Premiere Pro.
Best Practices when Building a Custom Brand Caption Kit for Multiple Client Accounts

Keeping a multi-client caption pipeline reliable requires strict project maintenance over time. Here is how we keep client assets organized:
Locking Master Project Templates
Store read-only master template files (.prproj) in your main asset directory. When starting a new project for Client A, duplicate the template file into the working client folder before opening it.
Duplicating master templates stops editors from accidentally saving sequence tweaks over master brand kit defaults.
Updating Client Brand Kits Without Breaking Active Timelines
When a client updates brand colors, update the root .prtextstyle files in their central workspace directory.
Import the revised .prtextstyle asset into active Premiere Pro project files and select Replace Style. Premiere automatically updates text formatting across active timeline sequences without breaking caption sync or manual cuts.
Onboarding Assistant Editors with Standardized Rules
When bringing on junior or assistant editors, clear guidelines stop production mistakes before they happen.
Keep a documented internal guide covering KreateFlo tool settings, baseline height limits, approved font files, and export naming rules. Clear documentation helps new team members deliver client-ready edits from day one.
Data from Goat Agency statistics shows that 73% of
Actionable Takeaway: Lock master project template files as read-only assets on your network drive to stop team members from overwriting default client settings.
Common Caption Kit Mistakes and How to Avoid Them
Even experienced editors run into predictable workflow friction. Watch out for these common errors when managing multi-client accounts:
Mixing Client Assets in a Single Master Timeline
Editing multiple client accounts inside one master sequence file leads straight to visual errors. Dragging graphic elements across adjacent tracks causes visual bleed when wrong styles export into client deliverables [6].
Always maintain separate sequence files and project directories for every client account.
Ignoring Social Platform Safe Zones
Designing tall caption blocks without checking mobile app overlays causes text obstruction. Always check your graphics against platform button layouts on actual mobile screens before shipping final exports.
Relying on Render-Heavy Third-Party Graphics Plugins
Using graphics plugins that force background rendering for minor text tweaks slows down editing workflows. Opt for native Premiere Pro track styles or light, WASM-powered extensions like KreateFlo to keep timeline playback smooth.
Pro Tip: Create a master sequence template with transparent target guides representing TikTok, YouTube Shorts, and Instagram Reels button zones. Drop your caption track into this sequence to check layout clearances instantly.
Actionable Takeaway: Isolate every client into their own Premiere project workspace to eliminate cross-contamination of brand assets.
Conclusion

Building a custom brand caption kit for multiple client accounts isn't just about making clips look clean—it's about protecting your sanity and eliminating manual rework. By setting up isolated workspaces, exporting clean native text styles, and using tools like KreateFlo's CaptionFlow, you can manage dozens of client accounts without missing deadlines or mixing up brand assets.
Download KreateFlo today to test 3 free tools forever, or upgrade to the Pro plan for $19.99/mo to automate your multi-client editing workflow inside Adobe Premiere Pro.
Frequently Asked Questions
How do I export and import caption text styles in Adobe Premiere Pro?
Select your formatted text block in the Essential Graphics panel, click the Text Style drop-down menu, and choose Create Style. Locate the newly created style asset in your Project Panel, right-click it, and choose Export Text Styles to save a .prtextstyle file [3]. To import it into another project, drag the .prtextstyle file directly into your Project Panel and apply it to any caption track.
How do video editing agencies manage brand kits for multiple clients without asset mix-ups?
Agencies isolate each client account into dedicated project workspace directories with strict file-naming rules [6]. They maintain locked visual reference sheets for color hex codes and fonts, importing client-specific .prtextstyle files into separate project files to prevent visual and brand voice crossover [5].
What core assets should be included in a video caption brand kit?
A comprehensive caption brand kit includes primary hex codes, secondary accent colors, approved font files (.otf/.ttf), background pill opacity settings, defined pixel baseline offsets for vertical safe zones, and exported .prtextstyle preset files [4].
Why is real-time WASM preview important for animated captions?
WebAssembly (WASM) rendering engine previewing allows editors to view animated caption updates instantly on the Premiere Pro timeline without background render delays. Real-time feedback saves hours during high-volume clip exports across multiple client accounts.
Is KreateFlo a standalone application or a Premiere Pro extension?
KreateFlo v1.0.3 is built specifically as a native CEP plugin extension for Adobe Premiere Pro. It operates directly inside your Premiere editing timeline workspace rather than requiring you to export files out to an external web application.
References
- blog.hubspot.com/marketing/hubspot-blog-social-media-marketing-report
- youtube.com/watch
- autocut.com/en/advanced-captions/
- designlumo.com/blog/brand-kit-setup-guide-for-digital-marketing-agencies
- socialctl.io/guides/brand-kit
- outlierkit.com/resources/how-to-produce-ad-creatives-for-multiple-clients/
- grandviewresearch.com/industry-analysis/social-media-management-market-report
- blazehive.io/statistics/social-media-marketing-statistics/
- sproutsocial.com/insights/social-media-statistics/
- goatagency.com/blog/social-media-marketing-statistics/
- sprinklr.com/blog/social-media-marketing-statistics/
- brandience.com/insights/social-media-trends-to-know-for-2026
- krumzi.com/blog/how-to-write-social-media-captions-that-actually-get-engagement-2026-guide
- bemysocial.com/social-media-caption-strategies/
- socialctl.io/features/brand-kit
- contentstack.com/docs/agent-os/brand-kit
- heropost.io/how-to-write-social-media-captions-2026-4/
- dittoepr.com/how-to-build-a-social-media-brand-kit/
- wordable.io/social-media-content-creation/
- designlumo.com/resources/trends-for-social-media-post-makers
Try KreateFlo free
3 tools forever, 7-day trial on the rest. No credit card to start.
Download KreateFlo